Friday, April 30, 2010

One More for Mother's Day

At church I teach the 3 year old kiddos.
Thought it would be fun to have a craft that they could make on Mother's Day.
It had to be something pretty quick, that could be done by the time their mother's picked them up.
So, we'll be making these cards.

Here's the outline that I traced.
I'm not much of an artist, but it will do.
Feel free to copy it for your use.


We'll use glue sitcks (so the dry time will be faster) to fill in the petals, stem & leaf.
Then, put down different swirls of yarn on top of the glue.
Shouldn't take too long and shouldn't be too messy...
a great combination for 3 year olds in a church!

Mother's Day Ideas

I know, I know... probably everyone who reads this is a Mother.
And you don't want to make yourself a gift!
These are more for your kids to make for YOUR mother.
Is is possible for grandmothers to get too many cute pictures of their grandkids?
Probably not.

Here are a few gift ideas that your kids can help make to give to grandma.
They are all inexpensive and easy.
If you like photography, like me, these are right up your alley.


Wednesday, April 28, 2010

Speaking of Balloons...

My boys discovered static electricity!
I told them I wanted to show them a magic trick.
Then, said a few magic words for effect.
Do you remember doing this as a kid?


How easy & fun is that?

Monday, April 26, 2010

Baby Boy #4


Wish me Luck!
Really though, I'm excited to have a 4th boy.
It has a nice even feel to it.
I told my husband I was going to need a pedicure every now and then,
 just to preserve my femininity!
Any ideas for names?
We're fresh out of boy names around here!

Friday, April 23, 2010

Failed Attempt

Well, here's how it went down...
My first grader had a half day (out of school @ noon).
So, for a week, we had planned on going swimming at our community pool.
The boys need to brush up on their swimming skills to get ready for summer swim team.
It had been in the 90s for over a week.
Wouldn't you know it, we woke up to cloudy skies, wind blowing and a high of 65 degrees!
Can't really complain, 65 feels awesome, but not in a swimming pool!
So, I had a little project I've been wanting to try.
Perfect day to do that, right?
We went to 4 stores trying to find the right kind of water bottle.
We never did find them!
But, I thought I'd post the project anyway.
Hopefully I'll find the right water bottle one of these days... or maybe you will...

Here it is:
HOVERCRAFT
Materials:
- balloon
- glue or duct tape- CD
- spout from water or juice bottle (not just any spout - it has to be the kind with the pop top, or maybe it's called a sports top?)

Instructions:
Glue the spout over the center of the CD. You can use craft glue, or a hot glue gun. Masking tape or duct tape would work too, but be sure the seal is air tight.

Push the spout down so that it is closed and no air can pass through.

Blow up the balloon. Don't tie it! Carefully stretch it so that it is over the spout.

Hold the bottom of the balloon in place with one hand. With the fingers of the other hand, carefully lift open the spout.
 The air in the balloon with be forced out through the drinking spout. It will create a blanket of air almost like a hovercraft. The CD, propelled by the balloon, will scoot all around the floor.

When it stops, just blow the balloon up again for more fun.

Sounds cool, right? Maybe some of you out there can find the right spout. Let me know if you do!


So, after trying 2 different fun activities, we made a fort with my old dust ruffle and the dining chairs, and threw in all of the plastic animals we could find.
It kept them occupied for all of 15 minutes!

You know what kept them happy for even longer?
The balloons from the failed hover craft attempt!
My 2 year old played with them for quite a while. In fact, he's playing with them again today.

Sometimes I wonder why I try to get all fancy with different projects and crafts!
Sometimes it's the simplest things...

Wednesday, April 21, 2010

Easy Birthday Cakes

I am NOT a cake decorator. But, I DO think it's fun. I have memories of my mother making fabulous cakes every year for my birthday. Maybe that's why I feel compelled to attempt the same for my kids.

Plus, I HATE the way grocery store cakes taste!
Anyone else?
I'm probably the only one, but I think they're gross.
I prefer to make my own, sort of, (from the box) cake.

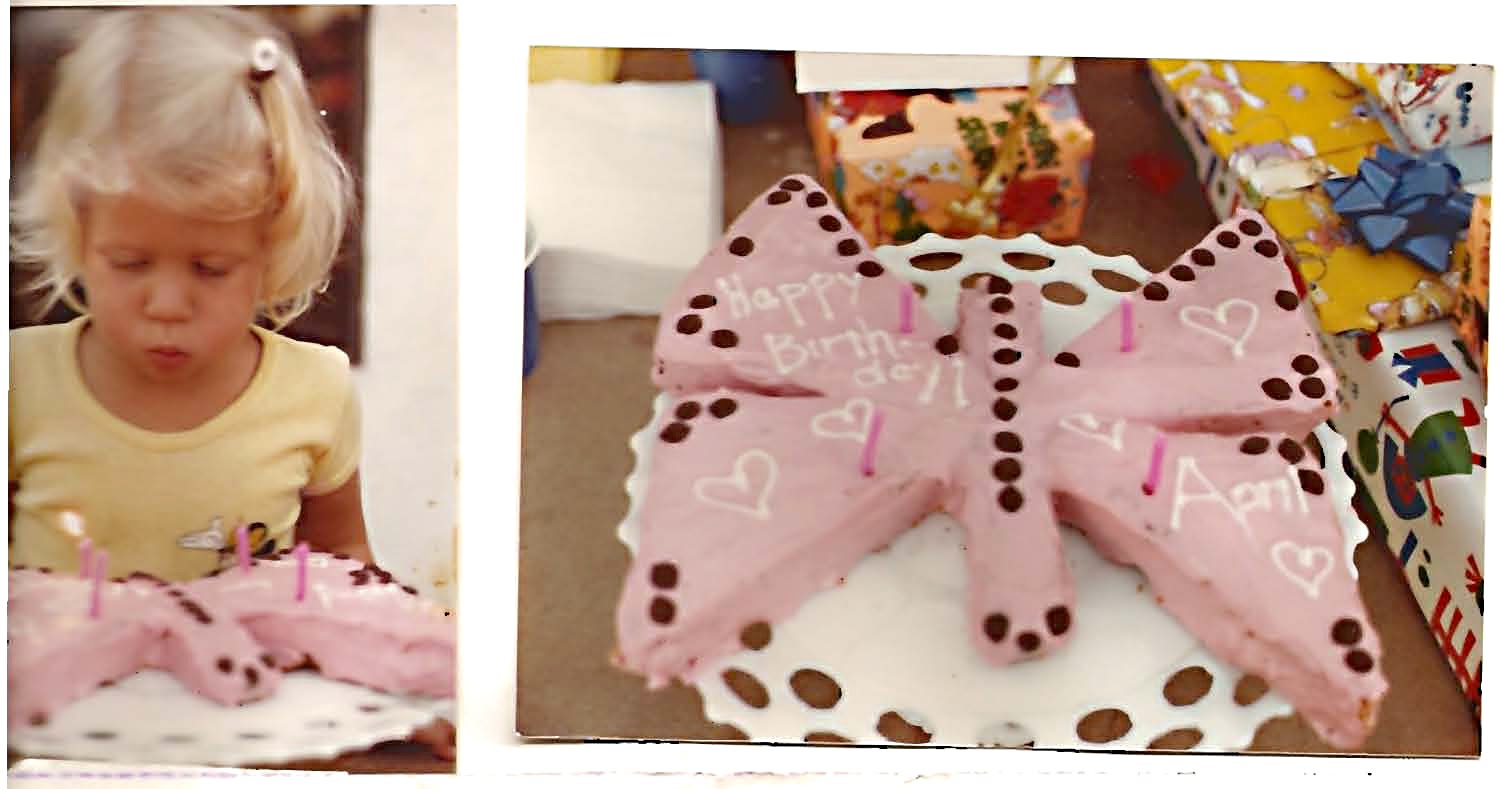
I thought this was the most beautiful cake I had ever seen!
(excuse the poor picture quality - I scanned it out of my baby book)
Wish I could get my hands on this cool cake platter!

 
Here are a few that I swear are really easy.
Maybe not completely professional looking, but great for little boys.


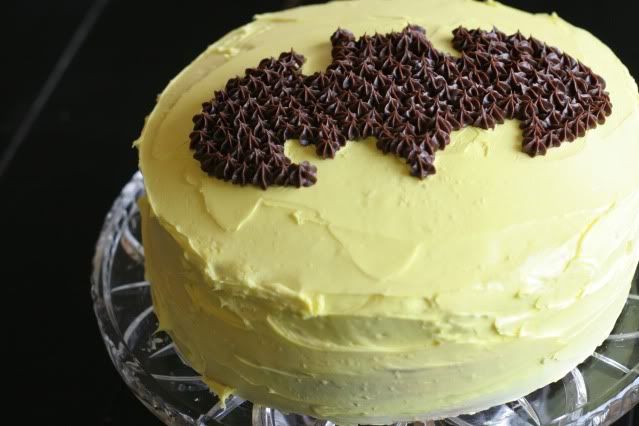
Boy #2 wanted a Batman cake for his birthday. My first thought was to make a bat shaped cake...
Then, I got smart. I just copied a clip art from the internet and printed it out the size thatI wanted.
I frosted the cake yellow.
Then, layed the bat on top of the cake and used a toothpick to trace it's outline.
Last, I used chocolate frosting (close enough to black) to fill in the bat.
You could do this same thing for almost any cake design!


 The Snake Cake.
You just bake the cake in a bundt pan & cut it into 4 equal sections.
Then rearrange the sections to resemble the shape of  a snake before frosting.
Add, your snake's design/pattern with frosting and candies,
and that's it!


The Turtle Cake (2 ways)
1 - bake all cupcakes
arrange them all, except for 5, in a circle
frost as decorated above
or
2 - bake one round cake and the rest cupcakes
and frost as shown

Either way works great.
Sometimes it's just easier to have cupcakes for a kid's party.

Here are a few that I've never done, but look cool and easy too.
I'm ALL about easy!

Most sports cakes are easy, like this basketball one.
I made a baseball cake one year, similar to this.
Just white frosting with red crisscrosses on a round cake.

or this football field cake

or this guitar cake

or this summer themed cake.
I did one similar, but used Teddy Grahams for the swimmers,
put fishy crackers around the sides, and used white lifesavers with red stripes as floatation devices.
(can't seem to find the picture)

Monday, April 19, 2010

Had to Share

Maybe many of you have already read this book, but I just had to plug it in case you haven't heard of it.


It's all about teaching your kids the importance of work!,
and being responsible, and saving their $, and being productive adults, etc...

She is also mother to 4 boys of her own!

I'm glad I didn't read this until my oldest was around 5 years old.
It may have been overwhelming prior to that.
They really can't do very many chores until around 4 years old anyway.
There's never any way I'm going to implement every single idea out of this book.
The woman is amazing!
But, she writes in an encouraging way, that makes you feel like you can do it.
I highly recommend it!
My 2 older boys do chores every morning now, and I love it!... even if they don't :) hehehe.

Have you read it? What did you think?

Any parenting books that you recommend?

Friday, April 16, 2010

Packing Peanut Building

My 2 year old's teacher at church told me about this one:
You can use packing peanuts to build things!

They have to be the biodegradable kind or it will not work. I happen to have some in a package we had just received in the mail. But, his teacher said that you can buy them at any packaging place like UPS.

Put some water in the bottom of a shallow bowl and dip one end of a packing peanut in the water for just a second. They need to get moist, but not soaking wet, or they'll start to dissolve.
My 5 year old wanted to make Ninja men. So, we let them dry for a minute and then used markers to decorate them.

Thursday, April 15, 2010

Toys for 2 Year Olds

My cute cousin left a comment the other day,
"...what do you do with a 2 year old? i am going crazy!!!"

Anyone who's had a 2 year old can sympathize. It can be a tough age!
Normally I try to only post about things that don't cost much money.
I mean, anyone can go to the toy store and spend a bunch of $ to try and keep their kids happy.
But, today, I thought I would show a few of my favorite toys for this difficult age.

First, this race track. We got it for my 2nd son, who loved it and now my 3rd son loves it too. It folds up pretty flat and small for easy storage which is also a plus.
Next, all 3 of my boys have spent a lot of time with this gumball machine thing. It just mezmerizes them. You put the ball in the top and then push the lever to make the ball roll down and then out the bottom.
Anything with a ball has been a bit hit with each boy.

The last toy is so much fun. Sorry, I don't know where to get it, but I know you can find one similar.
(We got it when we lived in Japan). You rest a ball on the hole in the top and then you use a little hammer/mallet to send the ball through the maze and out the bottom.
Again, anything that lets them watch a ball go through some sort of maze has been
a favorite of all 3 of my boys.
 
Hope this helps all the moms of 2 year olds out there!


Hang in there!

They do get older!
(I'm not sure if that means easier, but definitely less physically demanding!)

Wednesday, April 14, 2010

Shaving Cream Murals

In a former life, I was an elementary school teacher. One the last day of school I would spray each child's desk with shaving cream and let them play around a bit before using a paper towel to wipe it all away. It was fun for the kids and it was a great way to have them clean the desks. It really did take off all the old pencil marks and made the desks look new.

I had forgotten all about this, until a friend mentioned that she does the same thing with her kids at home.

This is a great activity for a wide range of ages. I had mine do it on our patio table outside so that we could just spray it off when they were done. They made a HUGE mess, but I think they would have been ok doing it inside with a little direction about keeping it on the table!

Monday, April 12, 2010

I'd lIke to Try:

My boys just DO NOT color! They rarely like doing any sort of craft either.
This looks like a fun way to maybe get them to sit for a while and get in touch with their artisitc side?

Facebox & Zoobox

I'm sure they would be cracking up and making all kinds of funny pictures.

Friday, April 9, 2010

Popcorn Race

What You'll Need:
Plastic or paper cups
tack or small nail
thick rubber bands
paper clips
lots of popcorn or packing peanuts seperated into 2 bags
2 shallow boxes or bowls (of the same size)

Prep:
Use a tack or small nail to poke a hole in the center of each cup bottom.
Push one end of a thick rubber band through the hole and into the cup.
Slip a paper clip on the end of the band, inside the cup, and gently pull the other end of the band until the end of the band rests on the inside of the cup. (The rubber band, worn around the ball of the foot, holds the cup in place atop a player's shoe.)
Set the 2 boxes or bowls about 5 yards beyond the starting line, oppisite the teams.


To Play:
Form 2 teams. At "GO", one boy on each team must fill the cups on their shoe with popcorn. Then, sprint down to their box and dump the popcorn into the box, trying to lose as little popcorn as possible along the way. The racers run back to tag the next teammate in line.
The race continues for 2 minutes, until one team has used all of their popcorn, or until each boy has gone al teast once.
The popcorn is then measured with a ruler or by cupfuls. The team with the most popcorn is the winner!

*Word of Caution*
If your husband is in charge of the Cub Scout activity,
ask him to do this race outside or in the garage,
before leaving the house!
OR
you could come home to
THIS!
*taken from the Cub Scout Program Helps book*

Wednesday, April 7, 2010

P-I-Z-Z-A

Ask any child what their favorite food is, and I'm sure at least 80% of them would tell you, "PIZZA!"
Mine are no different.
They love pizza.
But, that gets expensive & really (I'm no heathfood guru) it's not very good for them.
So, I set about finding a recipe that I can feel good about giving them on a consistent basis.
It's pretty easy (ok, not as easy a delivery), pretty cheap & pretty healthy.

Whole Wheat Pizza Dough
(this feeds my family of 5)
(I don't have a circular pizza pan. This makes enough dough to fill a large cookie sheet)


1 cup all-purpose flour
1 1/2 cups whole wheat flour
1 tsp. salt
1/8 tsp. onion powder
1/2 tsp. Italian Seasonings
2 packets active dry yeast
2 T. olive oil
1 tsp. sugar
1 1/4 cups warm water + 1 more Tablespoon

1. In a large mixing bowl, combine all dry ingredients except sugar & yeast.
2. Stir togther and form a hole in the center.
3. Mix the the remaining ingredients and pour into the hole.
4. Gently mix all together with your hands and form into a ball.
5. Knead on a floured surface for several minutes or until the dough is smooth & elastic.
6. Shape into a ball and place in a lightly greased bowl and cover with a dry cloth.
7. Let it rise to double the size. (usually around an hour or more depending on how warm your house is)
8. Punch down dough & form into a ball. Let rest for about 5 minutes.
9. On a floured surface, press or use a rolling pin until dough is slightly larger than your pan.
10. Fold dough in half and half again.
11. Place dough onto the edge of your well greased pan. You can also dust the pan with cornmeal if you like.
12. Unfold dough and push into the edges of the pan to form the crust.
13. Top with pizza or spagetti sauce and any toppings you like. For the cheese, I like to use some         chedder, some mozzerella and then sprinkle it with a little grated parmesean.
I also like to hide some veggies, that my kids normally won't eat, under the layer of cheese.
14. Bake at 500 degrees for about 12-15 minutes. My oven bakes pretty quick, so it doesn't take long.

Monday, April 5, 2010

After Easter?

Here are some things to do with all the leftover plastic eggs:

Egg Race
First, establish a race course with your runners.

When you're ready to start, separate the players into two or more teams and divide the eggs equally between them.
(Tip: You can use fewer eggs for younger players or increase the challenge by using more eggs for older racers.)
Have the teams line up with the first kid in each group holding his team's eggs in his arms.
At go, the egg holders must navigate the course, then return to start and pass their eggs to the next player in line.
If a runner drops any eggs along the way, he must stop and pick them up (a tough task with an already-full armload!). The first team whose runners have all completed the course wins.
If you only have a few runners, just have them all be on the same team and time each race.
With each new race, they can try to beat their old record.

Easter Egg Scavenger Hunt
Start by numbering all but one of the plastic eggs that will hold your clues with a permanent marker.
Decide how long & difficult you want your hunt to be and choose that many eggs.
Probably around 6.
Write a clue to the #1 egg's location and place it inside the empty egg.
Then, hide the egg with the #1 on it, in it's respective location.
Continue in this fashion until you've hidden all but the egg without a # on it.
Hand this egg to your child to begin the hunt.

All games were found and then adapted from: www.familyfun.com

Friday, April 2, 2010

Easter Morning Idea

I'm going to start this tradition at our house this year...

"We wake up Easter morning to find the Easter Bunny's maze winding through the entire house.
He ties a different color of yarn to each of our children's bedposts, and the kids have to follow their color (collecting their yarn as they go) to find their Easter basket hidden at the end of it.
The maze is really complicated too!
The yarn crisscrosses over stair railings, around doorknobs, through table legs, and, of course, over the other threads."

http://familyfun.go.com/easter/easter-games-egg-hunts/easter-morning-yarn-maze-706889/

Thursday, April 1, 2010

Super Science

My oldest says he's, "a future scientist."
He loves to do experiments.
Here is one we did last summer.
Fun & Delicious!... & easy!

Ice Cream In A Bag


Ingredients:
quart & gallon zipper bags
1/2 cup milk
1 tbsp sugar
1/2 tsp vanilla extract
6 tbsp salt (using Rock Salt is quicker, but I've found that regular salt works just fine)
2 cups ice cubes (1 ice cube tray worth)
*makes about 1 scoop of ice cream*
 
Mix vanilla extract, sugar, and milk. Pour into smaller size bag and seal closed. Put ice cubes and salt into larger size bag. Place the bag with milk mixture into the ice mixture bag and seal closed.

Make sure bags are sealed COMPLETELY.  Shake, shake, shake. Be careful not to get too rough or the salt my leak into the ice cream. You will feel the ice cream getting thicker. It takes about 5-10 minutes.

When ice cream is desired thickness, remove bag from ice mixture. Wipe the outside of bag with to remove salt, but DON'T rinse the bag under water or the ice cream will begin to melt.

Eat plain, or add our favorite, chocolate sandwich cookie pieces & chocolate syrup.

Here's WHY it works: (mine always ask "why?", do your's?)
"Ice has to absorb energy in order to melt, changing the phase of water from a solid to a liquid. When you use ice to cool the ingredients for ice cream, the energy is absorbed from the ingredients and from the outside environment (like your hands, if you are holding the baggie of ice!). When you add salt to the ice, it lowers the freezing point of the ice, so even more energy has to be absorbed from the environment in order for the ice to melt. This makes the ice colder than it was before, which is how your ice cream freezes. Ideally, you would make your ice cream using Rock Salt, which is just salt sold as large crystals instead of the small crystals you see in table salt. The larger crystals take more time to dissolve in the water around the ice, which allows for even cooling of the ice cream."